The Definitive Guide to Lowering Cloud Costs of Kubernetes Clusters
- Introduction: cost saving with your Kubernetes clusters
- Using Cluster AutoScaler to Lower Your Kubernetes Costs
- Using Horizontal Pod Autoscaler to Lower Your Kubernetes Costs
- Using AWS Spot Instances to Lower Your Kubernetes Costs
- Using Quotas to Lower Your Kubernetes Costs
- Using Pod Request and Limits to Lower Your Kubernetes Costs
- Conclusion: you can lower cloud costs by 50-70% for your Kubernetes clusters
- Need personalized help?
Introduction: cost saving with your Kubernetes clusters
Kubernetes is a great platform to deploy your application on. It gives you a very nice framework to work in and it takes care of a lot of the low-level infrastructure for you. This makes it easier for you and developers to deploy applications on top of it. However, as with all things, there are tradeoffs that come with this ease of deployment. It’s great because it is easy and there is less friction to deploying applications, but this also means that users can turn on applications with little effort and thought. We regularly see clients whose clusters are very overprovisioned and have single digit utilization ($$$!).
Because of the inherent sharing nature of Kubernetes, it’s difficult to see what is driving your cloud costs and therefore understand how you can lower cloud costs. In this post, I’ll outline the best options for helping you lower your cloud spend, from open source tactics to paid tools.
First things first: understand your cloud spend today
The first step in controlling your costs is to take the time to understand what your current infrastructure and costs look like. Assess the situation and then make smart data-driven decisions based on your evaluation. I fully believe in the mantra, “What you measure, you manage.” You need to know what’s going on holistically to take informed, actionable steps towards reducing your costs. What if your major cost is not from instances but instead from users that are requesting very large and fast EBS disks? By not taking an inventory on your compute spend, you might be optimizing the wrong thing.
From your cloud provider’s billing dashboard, you can get a total monthly cost across all services or by tags based on just one or all of your Kubernetes clusters:
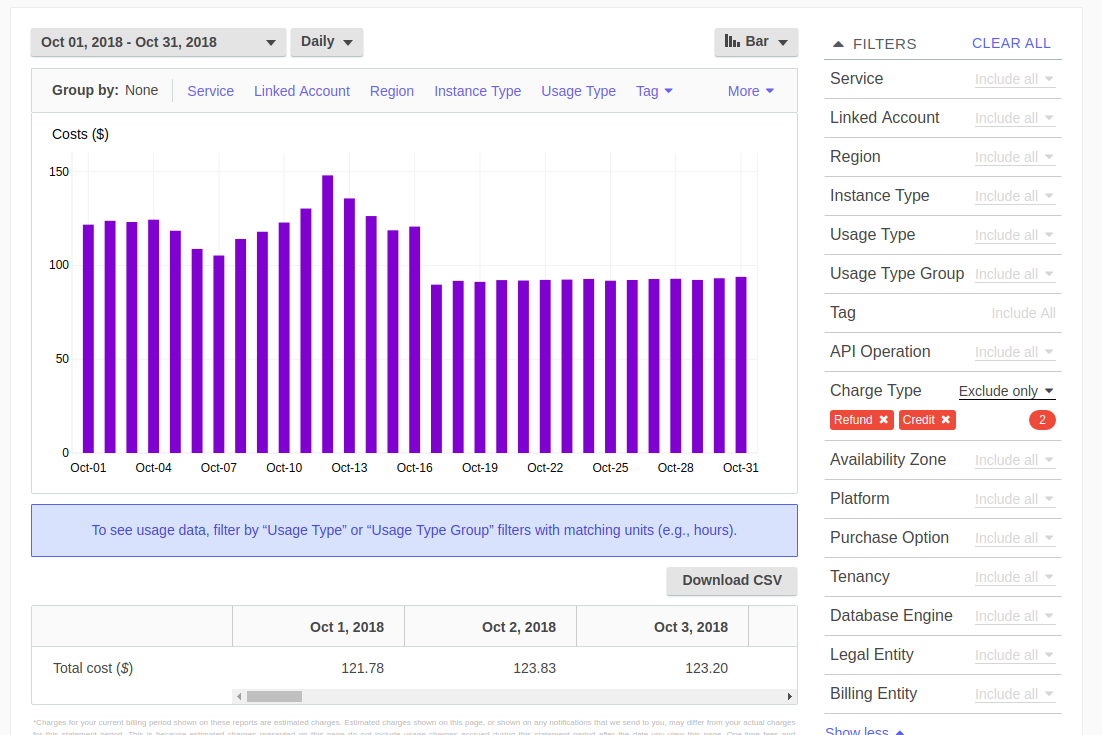
This is a good starting point for high-level information. It is telling me that I am spending around $100/day on all services on AWS. This makes my monthly bill ~$3k. This information is good but it is too high level. Let’s try to drill down into the details.
.png)
Grouping by “Service” gives us a stacked bar chart on where the daily costs are going. From here, we can see that “EC2-Other” and “EC2-Instances” are >80% of the daily cost and the rest of the costs are distributed over a few other items that are not contributing that much to my overall cloud spend.
From this, I know to focus my energy and time on reducing EC2 costs because that is the primary driver of my monthly costs. I have the potential to save significant dollars by taking a closer look at my EC2 instances.
You might be wondering what “EC2-Other” and “Others” are. Depending on the view, AWS buckets items like snapshots, load balancers, or NAT gateways into these categories.
If you group by “User Type,” you can get info about which instance and spot types are allocated to a day’s cost:
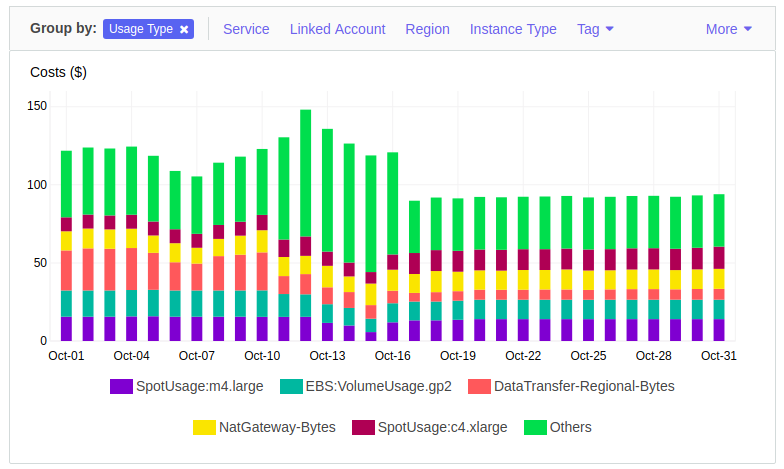
This is great information about my total costs at a high-level but I still don’t know which group of users on my Kubernetes cluster is using the most resources. Let’s say that $80/day on instance related cost is too high and we need to optimize our cloud spend. These charts point out what is my biggest cost, but not which team or customer is responsible for it.
This is because Kubernetes is a multi-tenant type cluster system. Workloads from different applications or groups can run on the same node, giving you better efficiency and resiliency by utilizing a single node for more than one purpose. However, this also makes your billing and infrastructure more complicated.
To get the additional information we need, we need to go to Kubernetes and ask, “What is running on these nodes and how much CPU, memory, and disk(s) is it using?”
Tools for understanding your cloud bill
There are many different ways that you can understand your Kubernetes cost allocation:
- The large cloud monitoring companies, such as CloudHealth, CloudCheckr, and Cloudability , offer monitoring. This comes at a steep price (2.5% of your cloud spend) and unfortunately, you cannot decouple this feature from their overall product.
- For clusters on GKE, they just launched a free cost metering tool. Here’s an example of what the dashboard looks like.
- CoreOS offers an open source metering option
- ManagedKube offers a paid Kubernetes cost allocation product.
The tool that you use to understand your cloud bill isn’t important, only that you build cost visibility into your Kubernetes clusters. Once you know how much you’re spending on every pod, instance, and persistent volume, you can:
- Create a game plan for controlling your cloud spend
- Understand product margins in multi-tenancy situations
- Forecast and plan budgets better
Using Cluster AutoScaler to Lower Your Kubernetes Costs
The Cluster AutoScaler is a Kubernetes project that helps you dynamically scale your cloud instances on and off. The project source and documentation is here. It is a process that you turn on inside your cluster that talks to the Kubernetes API and watches for certain signals. One of those signals are pods in a “pending” state due to no nodes being available for Kubernetes to schedule (run) on.
By doing a kubectl get pods, you can see what is pending.

The Cluster AutoScaler takes into account what you are trying to turn on and if the nodes groups it has access to for it to increase the number of nodes. If it determines that the pod that is trying to get scheduled out will get scheduled out if it turned on a new instance, the cluster autoscaler will turn on an instance for you.
By describing a pod by running the command: kubectl describe pod <pod name>
You get the events that are associated with this pod. This event is telling you that the cluster-autoscaler” is scaling up the instance group from 1 node to 2 nodes.

You might think, great…this will help me spend more. How is this helping me save money?
That is a very good question. The Cluster AutoScaler also does this in reverse with the scale-down-* parameters. The Cluster AutoScaler will scale down nodes with nothing running on them or, depending on the settings you give the cluster autoscaler, it will try to condense the pods you have running on various instances down to fewer instances.
This is a very good service for your cluster as it will scale the number of instances up and down per your requirements. While this tool works well, it is not foolproof. The Cluster AutoScaler is pretty conservative; most of the scaling down errs on the side of caution. If for any reason it thinks it is not safe to scale down and compact the pods onto a node, it will not. So while you might take a look at it and think it should scale down, sometimes it might not. You have to tune the scale-down-* parameters to your liking. The first step is to run this and have it in motion. Then, you can continue to customize the Customer AutoScaler’s actions to mirror how you would manage the cluster.
Using Horizontal Pod Autoscaler to Lower Your Kubernetes Costs
The Kubernetes Horizontal Pod Autoscaler helps you scale a deployment based on CPU utilization. In its most basic form, you can set it up to scale out the deployment when the aggregate CPU usage is over X and then scale it back down when it has reached another threshold. This allows you to dynamically adjust your workload based on CPU usage by using a built in functionality of Kubernetes.
This works really well if your workload is CPU bound and scales on this axis. When it is off peak hours this technique will help you scale down the number of pods you are running to the lowest amount you have set and then at peak hours, it will grow to the maximum amount you have set. This is all done with minimal effort from you.
If your application does not scale on the CPU axis, you can use custom metrics. There is a bit more work for you to do on this front. You have to actively figure out what metrics you want and then expose it to Kubernetes so that Kubernetes can watch it to scale up and down on this metric. The great part is that the Kubernetes framework has done most of the heavy lifting for you; the hard part is exposing the metric you want and then it’s pretty straightforward to use the same configurations to scale up and down.
Using AWS Spot Instances to Lower Your Kubernetes Costs
If you are running your Kubernetes cluster on AWS, you can utilize Spot instances. These are instances that AWS deems as spare instances and offers them to you at a substantially lower price. The price of Spot instances fluctuate based on demand for an instance type in a particular AWS zone and region.
Here’s the background for how AWS Spot Instances came to be: When it is peak shopping season like Black Friday or Amazon Prime Day, users of AWS will most likely scale out their systems and request more EC2 instances. This means that there is less available capacity in a certain AWS zone/region. In turn, the Spot prices of the instances will go up because demand has gone up but the supply is fixed. It can even go higher than the price of the same on-demand EC2 instance. If this happens, AWS is sending very strong pricing signals to have you turn off your Spot instance!
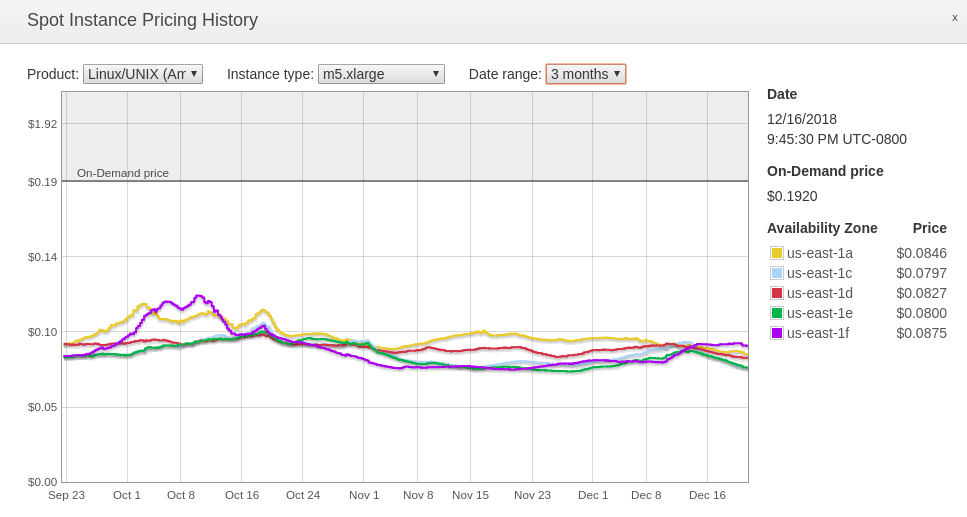
If you are able to leverage this type of instance, then you can save a lot. From the Spot Instance Pricing History chart (also viewable in the AWS console), the On-Demand price for a normal m5.xlarge instance is $0.1920/hour. The average price for the last three months on a Spot Instance has been around $0.090/hour. That means you could be saving ~50% off of the On-Demand price with a Spot Instance if you can stomach the ups and downs of the prices. One important way to prepare for the volatility of Spot Instance pricing is to have a scheme in place so that if the Spot price goes beyond what you want to bid for (which can happen at anytime), you have an automated mechanism to switch from using Spot Instances to using On-Demand Instances or find other Spot Instances to turn on.
Using SpotInst.com
SpotInst.com (not affiliated with AWS Spot Instances) is a very good paid option to manage Spot Instances and On Demand Instances. This company exclusively helps you to safely use Spot Instances. They charge you 10-12% (I have heard of volume deals negotiated to <5%) of your savings from using Spot Instances. If you wouldn’t otherwise set up the infrastructure to use Spot Instances, SpotInst.com is in essence a ‘free’ service since it just reduces the amount that you save from using Spot Instances. And if you would set up your own infrastructure to use Spot Instances, the key question to ask then is if that internal development will cost you more than 10-12% of your ongoing savings?
SpotInst.com will help you maintain a fleet of servers that can be a mix of Spot or On-Demand Instances. If the Spot prices go above what you’d like to pay, they will turn on the On-Demand Instances for you. They have very fancy predictive algorithms that forecast when Spot prices will go up or down. SpotInst.com then uses this information to manage your fleet, either by turning you on other Spot Instances or using On-Demand Instances to fulfill what you have specified as the minimum number of instances in your fleet. They are also natively integrated with Kubernetes, so they can tell your Kubernetes cluster when they are going to take an instance offline by cordoning it off and draining the pods off that node safely instead of just turning it off. SpotInst.com is a good option if you would like to buy a solution. It is very well rounded and offers a lot of great features.
What if you are the kind of person that wants to do it on your own? There are good options for that as well but it does get fairly technical.
EKS and Spot Fleets
EKS and Spot - If you are on AWS, you might be using EKS. With EKS, you can utilize what AWS calls Spot Fleets. This does something similar to what SpotInst.com will help you do. You give it the number of and type of instances that you want and the Spot Fleet will try to ensure that it makes that happen for you. The difference between this and using SpotInst is that by using this solution, there are many more integration touch points that you have to do yourself and maintain overtime. If you have a DevOps team, this could be a good project for them to take on.
No matter how you implement it, using Spot instances can substantially lower the cost of running your Kubernetes cluster. The key thing to remember is that you must prepare sufficiently in order to do this safely without workload any interruptions.
Using Quotas to Lower Your Kubernetes Costs
Kubernetes quotas is native functionality that allows you to place quota limits on a namespace. A namsepace is a logical construct in Kubernetes that allows you to separate out the cluster into smaller semi-isolated spaces. This allows you to then give one team a namespace or give a team a few namespaces like: dev, qa, staging, etc. You can then delegate that namespace to this team giving them pretty much full control of it but limiting them by using quotas so that they cannot request a thousand CPUs or hundreds of terrabyte of disks.
You can limit them by:
- Configmaps
- Persistent Volume Claims
- Pods
- Replication Controllers
- Services
- Loadbalancers
- Nodeports
- Secrets
What we are most interested in this post are the items that cost money.
Arguably the items that cost the most money are CPU, memory, and disks. You can place a setting like on a namespace:
apiVersion: v1
kind: ResourceQuota
metadata:
  name: team-one-limit
spec:
   pod: 50
   hard:
   cpu: "10000"
   memory: 200Gi
This would place a maximum of 10 CPU cores, 200 GB of memory, and a maximum of 50 pods limit on the namespace. The team would be able to request up to this amount with no problem and after this amount, there will be error messages telling the team it has exceeded their quota.
There are various options on setting disks limits and even cloud CPU limits on a namespace.
If you are serious about controlling cost on Kubernetes, using Quotas is definitely one of the tools you will use to ensure someone don’t accidentally or purposefully create 1000 pods of something requesting 10 CPUs each!
Using Pod Request and Limits to Lower Your Kubernetes Costs
Kubernetes has settings for each type of deployment that can set the resource request (low) and the limits (high) on what each pod wants for CPU and memory. This indirectly helps you with controlling cost on a Kubernetes cluster.
apiVersion: v1
kind: Pod | Deployment | Statefulset | Daemonset | etc
metadata:
  name: my-app
spec:
  containers:
  - name: web
    image: web:1.0
    resources:
      requests:
        memory: "128Mi"
        cpu: "250m"
      limits:
        memory: "512Mi"
        cpu: "500m"
1028Mi is equivalent to 1GB; 500m is equivalent to 0.5 CPU core
By setting the “requests” you ensure that this item will be guaranteed that low limit threshold that it has asked for. Kubernetes will not schedule (run) this unit unless the instance has at least this much free capacity.
The “limits” set is the high limit on what this item can consume. You do have to remember some nuances of Linux though. While memory is set as a hard limit at the number given, CPU is not. The unit’s CPU can burst to use all the CPU until there is contention. Contention meaning other processes are asking for CPU time. When there is contention then this “limit” number starts to take effect on how many CPU cycle it will get.
By using these two settings is how you get to an over provision number you are tolerating on this cluster. For example and to make things simple lets say you are running a 1 node cluster that has 1 CPU and 1 GB of memory.
To set the above “my-app” example to the most conservative setting with no over provisioning of a node possible, you would set the resource requests to:
    resources:
      requests:
        memory: "512Mi"
        cpu: "500m"
      limits:
        memory: "512Mi"
        cpu: "500m"
This means that on the one instance you have, you will be able to schedule out exactly 2 of these items (just an example, not accounting for cluster services). Kubernetes will not and won’t be able to schedule more than two of these items on this node type.
Let’s say you want to be more aggressive and you know that most of the time this application does not use all of the resources specificed and you can over provision:
    resources:
      requests:
        memory: "256Mi"
        cpu: "250m"
      limits:
        memory: "512Mi"
        cpu: "500m"
These settings will allow 4 of these items to be scheduled out on this one node. Remember Kubernetes only looks for the “requests” (low) to make sure it can fulfill these items before it schedules it out. Now you have doubled the capacity of what was running on this node. Is this is good or a bad thing? Without more context like what the application is doing and how it performs, it is very hard to tell. Maybe this is a development system and performance is not a big deal. You just need to have these items up and running so it can answer the few requests that comes by. This simply demonstrates how you can use these settings to set an over-provisioning ratio.
Conclusion: you can lower cloud costs by 50-70% for your Kubernetes clusters
You can use all of the tools both independently and together to dramatically lower your Kubernetes costs. In summary, for best results:
- Understand your cloud spend today and identify the biggest drivers of costs
- Determine which of the available tools described above are most helpful to driving down your costs
- Don’t forget to address the tradeoffs of the above tools so your clusters are stable
Need personalized help?
ManagedKube provides DevOps consulting services that help you leverage the power of Docker/Kubernetes in building highly resilient, secure, and scalable fully automated CI/CD workflows.
Schedule a free 15 minute consultation today by e-mailing us: consulting@managedkube.com
Contact me if you have any questions about this or want to chat, happy to start a dialog or help out: blogs@managedkube.com {::nomarkdown}
Learn more about integrating Kubernetes apps
{:/nomarkdown}
kubernetes | cloud | costs